Manual gearbox flushing is a crucial maintenance procedure, ensuring optimal performance and longevity of your vehicle’s transmission system. It involves replacing old, contaminated gear oil with fresh fluid, restoring smooth shifting and protecting internal components from wear and tear.

What is a Manual Gearbox Flush?
A manual gearbox flush is a comprehensive service that goes beyond a simple oil change. It’s a process designed to completely remove old, degraded gearbox oil, along with any accumulated metal particles, debris, and contaminants that build up over time. Unlike a standard drain and fill, a flush utilizes specialized equipment or a specific procedure to circulate cleaning fluid throughout the entire gearbox system.
This ensures that all internal components – gears, bearings, and synchronizers – are thoroughly cleaned and lubricated. The goal is to eliminate sludge and deposits that can hinder smooth shifting, cause noise, and ultimately lead to premature wear or even failure of the transmission. It’s a proactive maintenance step to restore and maintain optimal gearbox function.
Why Flush a Manual Gearbox?
Flushing a manual gearbox is vital for several reasons. Over time, gearbox oil breaks down, losing its lubricating properties and becoming contaminated with metal shavings from gear wear and clutch material. This degraded oil can cause rough shifting, difficulty selecting gears, and increased wear on internal components. A flush removes these contaminants, preventing further damage.
Regular flushing maintains optimal lubrication, reducing friction and heat buildup. This extends the life of the gearbox, improves fuel efficiency, and ensures smooth, precise gear changes. Ignoring this maintenance can lead to costly repairs or complete transmission failure. Proactive flushing is a cost-effective way to preserve your vehicle’s performance and reliability.

Tools and Materials Needed
Successfully flushing a manual gearbox requires specific tools: gearbox oil, a drain pan, socket sets, wrenches, a funnel, and a torque wrench for proper tightening.
Gearbox Oil (Correct Specification)
Selecting the correct gearbox oil is paramount for a successful flush and the long-term health of your transmission. Using the wrong specification can lead to poor shifting performance, increased wear, and even catastrophic failure. Consult your vehicle’s owner’s manual or a trusted parts supplier to determine the precise grade and type of oil recommended by the manufacturer.
Gear oils are categorized by viscosity (e.g., 75W-90, 80W-90) and API service classification (e.g., GL-4, GL-5). These designations indicate the oil’s ability to flow at different temperatures and its level of extreme pressure additives. Synthetic oils generally offer superior performance and protection compared to conventional mineral oils, especially in demanding conditions. Ensure the oil is compatible with the materials used in your gearbox, particularly if it contains brass or copper components, as some GL-5 oils can be corrosive to these metals.
Drain Pan
A sufficiently large drain pan is essential for safely collecting the used gearbox oil during the flushing process. Gear oil is a hazardous material and must be disposed of responsibly, adhering to local environmental regulations. The pan should have a capacity of at least the gearbox’s total oil volume, typically ranging from 2 to 5 quarts, to prevent spills and overflows.
Choose a pan made from durable, oil-resistant plastic or metal. A low profile and wide opening facilitate easy positioning under the drain plug and minimize splashing. Some pans feature a spout or pour handle for convenient transfer of the used oil into a sealed container for recycling or disposal. Always place the drain pan on a protected surface, such as a drop cloth or cardboard, to prevent oil stains.
Socket Set & Wrenches
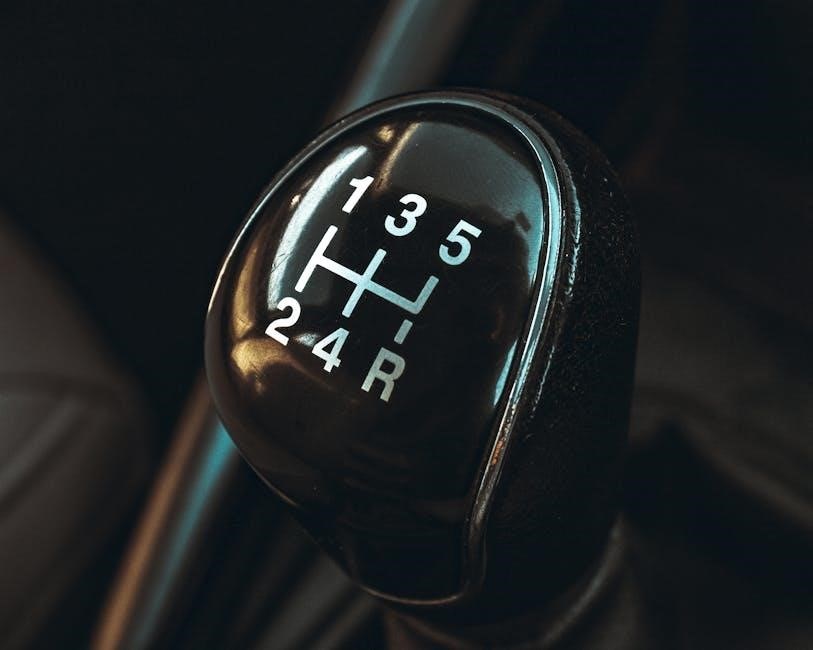
A comprehensive socket set and a selection of wrenches are vital for removing the drain and fill plugs on the manual gearbox. The specific sizes required will vary depending on the vehicle make and model, so consult your vehicle’s repair manual for accurate specifications. Metric sockets and wrenches are commonly used on most modern vehicles.
Ensure the socket set includes both shallow and deep sockets, as well as extensions, to access plugs in recessed locations. Wrenches, both open-end and box-end, provide alternative options for loosening and tightening the plugs. Using the correct size socket or wrench prevents rounding off the plug heads, which can lead to significant complications during the flushing procedure.
Funnel
A funnel is an indispensable tool when refilling the manual gearbox with new gear oil. It ensures a clean and controlled transfer of fluid, minimizing spills and preventing contamination. Choose a funnel with a flexible spout to easily direct the oil into the fill plug opening, which can sometimes be in a hard-to-reach location.
The funnel’s size should be appropriate for the opening, avoiding excessive splashing or overflow. A long-necked funnel is particularly useful for gearboxes with recessed fill plugs. Consider using a funnel with a mesh filter to catch any debris that might be present in the new gear oil, further protecting the gearbox internals. Proper funnel usage streamlines the refilling process.
Torque Wrench
A torque wrench is absolutely essential for correctly tightening the drain and fill plugs after the manual gearbox flush. Applying the correct torque specification prevents damage to the gearbox housing and ensures a secure seal, preventing leaks. Over-tightening can strip the threads, while under-tightening risks oil seepage.
Consult your vehicle’s repair manual for the precise torque values for these plugs. Using a torque wrench guarantees consistent and accurate tightening, protecting the gearbox from potential issues. It’s a small investment that can save significant repair costs down the line. Always double-check the torque setting before applying force.

Step-by-Step Flushing Procedure
Following a detailed procedure is vital for a successful manual gearbox flush, encompassing draining old oil, cleaning, and refilling with the correct specification fluid.
Draining the Old Gear Oil
Begin by warming up the gearbox slightly for optimal flow, but ensure the oil isn’t scalding hot. Locate the drain plug, typically at the gearbox’s lowest point, and position a drain pan underneath. Using the correct socket or wrench, carefully loosen and remove the drain plug, allowing the old gear oil to fully drain.
Inspect the drained oil for metal shavings, which indicate potential internal wear. Once completely drained, clean the drain plug and its sealing washer, replacing the washer if damaged. Properly dispose of the used gear oil at a designated recycling center, adhering to environmental regulations. This initial step is fundamental for a successful flush.
Initial Fill with Cleaning Fluid
After draining the old oil, prepare to introduce a specialized gearbox cleaning fluid. This fluid is designed to suspend contaminants and prepare the system for a thorough flush. Using a funnel, carefully pour the cleaning fluid into the gearbox through the fill plug opening.
Do not overfill at this stage; aim for approximately the same volume as the oil previously drained. Once filled, replace the fill plug loosely. The next crucial step involves running the engine briefly to circulate the cleaning fluid throughout the gearbox, ensuring it reaches all internal components and loosens accumulated debris.
Running the Engine with Cleaning Fluid
With the cleaning fluid inside, start the engine and allow it to idle for a short, specified period – typically 5 to 10 minutes. Avoid driving the vehicle during this phase. Gently engage each gear, holding the clutch in for a few seconds per gear, to ensure the cleaning fluid circulates through all gears and synchronizers.
This process helps to lift and suspend any remaining metallic particles, sludge, or other contaminants. Monitor for any unusual noises during this process. After the idling period, shut off the engine and prepare for the next step: draining the contaminated cleaning fluid.
Draining the Cleaning Fluid
Immediately after running the engine with the cleaning fluid, proceed to drain it while the fluid is still warm – this aids in contaminant suspension. Position the drain pan beneath the gearbox drain plug and carefully remove the plug using the appropriate socket or wrench. Allow the fluid to drain completely, which may take 20-30 minutes.
Inspect the drained fluid for the presence of metal shavings, debris, or a cloudy appearance, indicating significant wear or contamination. Once fully drained, thoroughly clean the drain plug and inspect its magnetic tip for accumulated metallic particles. Replace the drain plug with a new crush washer, if applicable.
Refilling with New Gear Oil
With the drain plug securely reinstalled, locate the gearbox fill plug. Using a funnel, carefully pour in the manufacturer’s recommended specification and quantity of new gear oil. Avoid overfilling, as this can lead to pressure buildup and leaks. Start with slightly less than the specified amount, as a final level check is essential.
Ensure the new oil is of the correct viscosity and meets the vehicle’s requirements. After adding the initial amount, reinstall the fill plug loosely. Proceed to check the oil level as described in the following section, adding more oil incrementally until the correct level is reached, then tighten the fill plug to the specified torque.

Checking the Oil Level
Accurate oil level verification is vital post-flush. Locate fill and check plugs, then follow the proper procedure to ensure optimal gearbox function and prevent damage.
Locating the Fill and Check Plugs
Identifying the fill and check plugs is the first step in verifying your manual gearbox oil level after a flush. These plugs are typically located on the side of the transmission casing. The fill plug is where the new oil is added, and it’s often larger than the check plug.
The check plug is used to determine if the oil level is correct. It’s usually positioned slightly higher than the fill plug. Consult your vehicle’s repair manual for the precise location of these plugs, as they can vary depending on the make and model. Ensure the vehicle is on a level surface before proceeding to check the oil level, as an uneven surface will give an inaccurate reading.
Proper Oil Level Procedure
Checking the oil level requires removing the check plug while the gearbox is filled to the correct amount. With the engine off, and the transmission warmed up (but not hot), slowly add new gear oil through the fill plug until oil begins to trickle out of the check plug opening.
This indicates the gearbox is full. Replace both plugs, tightening them to the manufacturer’s specified torque using a torque wrench. Avoid over-tightening, as this can damage the threads. Wipe away any excess oil. A correctly filled gearbox ensures proper lubrication and prevents damage to the gears, contributing to smooth operation and extended lifespan.
Potential Problems and Troubleshooting

Following a flush, issues like stuck drain plugs, oil leaks, or increased gearbox noise can occur; careful inspection and proper torque are essential for resolution.
Difficulty Removing Drain/Fill Plugs
Encountering stubborn drain or fill plugs is a common frustration during a manual gearbox flush. Over-tightening during the original installation, corrosion, or damage to the plug’s threads are frequent culprits. Applying penetrating oil several hours, or even overnight, before attempting removal can significantly help loosen the plug.
Using the correct size socket or wrench is paramount to avoid rounding off the plug’s head. If the plug remains stuck, gentle tapping with a hammer, combined with the wrench, might dislodge it. Avoid excessive force, as this can strip the threads in the gearbox casing, leading to costly repairs. If rounding occurs, specialized removal tools, like a bolt extractor, may be necessary.
Gear Oil Leaks After Flush
Post-flush gear oil leaks are concerning, often stemming from improperly tightened drain or fill plugs. Always use a torque wrench to secure these plugs to the manufacturer’s specified torque setting – overtightening can damage the threads, while undertightening leads to leaks. Inspect the sealing washers on the plugs; replace them if damaged or worn, as they provide a crucial seal.

Leaks can also indicate existing damage to the gearbox casing or seals, exacerbated by the flushing process. Carefully examine the gearbox for any visible cracks or seepage. If leaks persist after re-torquing and washer replacement, professional inspection is recommended to diagnose and address potential internal seal failures or casing damage.

Noisy Gearbox After Flush
A noisy gearbox following a flush can indicate several issues. Initially, a slight increase in noise is normal as the new oil lacks the worn particles that previously dampened sounds. However, persistent or worsening noises require investigation. Incorrect oil specification is a common culprit; ensure the oil meets the manufacturer’s exact requirements for viscosity and compatibility.
Internal gearbox wear, previously masked by the old oil’s viscosity, may become apparent with the thinner new oil. This could signal worn synchronizers or bearings. If the noise is a whine, it might indicate insufficient lubrication or damaged gears. A professional gearbox inspection is crucial to diagnose the source of the noise and prevent further damage.

Preventative Maintenance & Frequency
Regular gear oil checks and timely flushes are vital for longevity. Recommended intervals vary, but generally, a flush every 30,000-60,000 miles is advisable for optimal performance.
Recommended Flush Intervals
Determining the ideal flush interval for your manual gearbox depends on several factors, including driving conditions and the type of gear oil used. For typical, everyday driving, a comprehensive flush every 30,000 to 60,000 miles (48,000 to 96,000 kilometers) is generally recommended.
However, if you frequently engage in demanding activities like towing, off-roading, or aggressive driving, shortening this interval to 20,000 to 30,000 miles (32,000 to 48,000 kilometers) is prudent. Synthetic gear oils often offer extended protection and may allow for longer intervals, potentially up to 75,000 miles (120,000 kilometers), but always consult your vehicle’s owner’s manual.
Regularly monitoring the oil’s condition – checking for metallic particles or a burnt smell – can also help you determine when a flush is necessary, regardless of mileage.
Regular Gear Oil Checks
Proactive gear oil checks are vital for maintaining a healthy manual gearbox and preventing costly repairs. Inspect the oil level monthly, using the designated fill/check plug, ensuring it resides within the specified range. Visually examine the oil’s condition; healthy oil should be a translucent amber color.
Dark, cloudy, or metallic-flecked oil indicates contamination or wear, signaling the need for a flush. A burnt odor also suggests overheating and degradation. Simple dipstick checks, if equipped, can reveal similar issues.
Consistent monitoring allows for early detection of problems, preventing extensive damage and extending the gearbox’s lifespan. Remember, preventative maintenance is always more cost-effective than major repairs.